Friday, December 27, 2013

Vanilla Hot Cocoa Drink


Hot Chocolate drink is one thing that will ease you especially when it's cold outside. Not only my kids, we too love this during winter months. First thing kids would want when the snow starts to fall and they are heading out to enjoy it. "Will you make that hot cocoa Mamma when we come back?". Who can say no to that request! So I usually cut short my play time to make these hot cocoas for them.

Prep Time: 5 min | Cooking Time: 10 min | Servings: 2

Recipe Source: Ellie Krieger
Ingredients:

Milk - 2 Cups
Cinnamon - Small Stick
Cocoa Powder - 2 tsp.
Sugar - 1 tbsp.
Water - 2 tbsp.
Vanilla Essence - 1 tsp.
Chocolate Shavings (Optional) - 1 tsp

Method Of Preparation:

~ In a saucepan heat the milk with cinnamon.
~ Mix Cocoa Powder, Sugar and Water in a small bowl until smooth paste.
~ Once bubbles start appearing on the edges of the milk coming to boil, add in the cocoa paste mix it thoroughly.~ Take the milk off the heat and add in vanilla essence.
~ Pour the hot cocoa into two glasses, top it with chocolate shavings.


Sunday, December 22, 2013

Red Velvet Crinkle Cookies


Merry Christmas and Happy Holidays everyone! With Christmas eve almost in sight, bake these delicious crinkle cookies for Mr. Kris Kringle. These crinkle cookies sure to impress. I had tried this recipe, cut into half 2 weeks ago. It turned out so good that I decided to make them again. It's not only a feast to your eyes, the subtle hint of cocoa, right amount of sweetness and in between surprises of biting into chocolate morsels makes this a sure winner.

Prep Time: 20 min | Baking Time: 15 mins | Waiting Time: 1 Hr | Makes : About 40

Recipe Courtesy: Cooking Classy
Ingredients:
All Purpose Flour + Multi-grain Flour - 3 cups
Cocoa Powder - 1/4 cup
Salt - 1/2 tsp.
Baking Powder - 2 tsp.
Baking soda - 1/2 tsp.
Softened Butter - 1/2 Cup
Olive Oil - 1/3 Cup
Granulated Sugar - 1 1/3 Cups
Eggs - 3
Buttermilk - 2 tbsp.
Vanilla Essence - 2 tsp.
Red food coloring - 2 tsp.
White Chocolate Morsels - 3/4 Cup
Powdered sugar - 1/2 Cup (To roll the cookies)

Method of Preparation:

~ In a small bowl, mix flour, cocoa powder, salt, baking powder and baking soda and keep it aside.
~ In another large bowl using electric mixer, whip butter, oil and sugar together to form soft peaks.
~ Add in one egg at a time, blending each one into the mixture.
~ Add buttermilk, vanilla essence and the food coloring.
~ Slowly add in the dry flour ingredients and mix until combined.
~ Gently fold in the caramel bites. Cover with a plastic wrap and leave it the fridge for atleast an hour.
~ After you take out the dough out of the refrigerator, pre-heat the oven to 350 deg.
~ Place powdered sugar in a bowl. Scoop out small balls of the dough, shape them and roll them into powdered sugar. Transfer them to parchment lined cookie sheets. Handle them gently, otherwise the powdered sugar won't be visible at the end of baking.
~ Bake for about 12 mins, take it out and cool them on a wire rack. Once cooled store them in air tight container.


Note:
- Baking time depends upon how big the cookies are. I had a size of a medium lime.
- When you take them out, after cooling store them immediately. This is true for all the cookies especially when it's cold outside. They tend harden otherwise.

You might also like Red Velvet Cupcakes

Sending this to Vardhini's Bake Fest event @With A Spin

Wednesday, December 18, 2013

Seekh Kabab (Oven Baked)


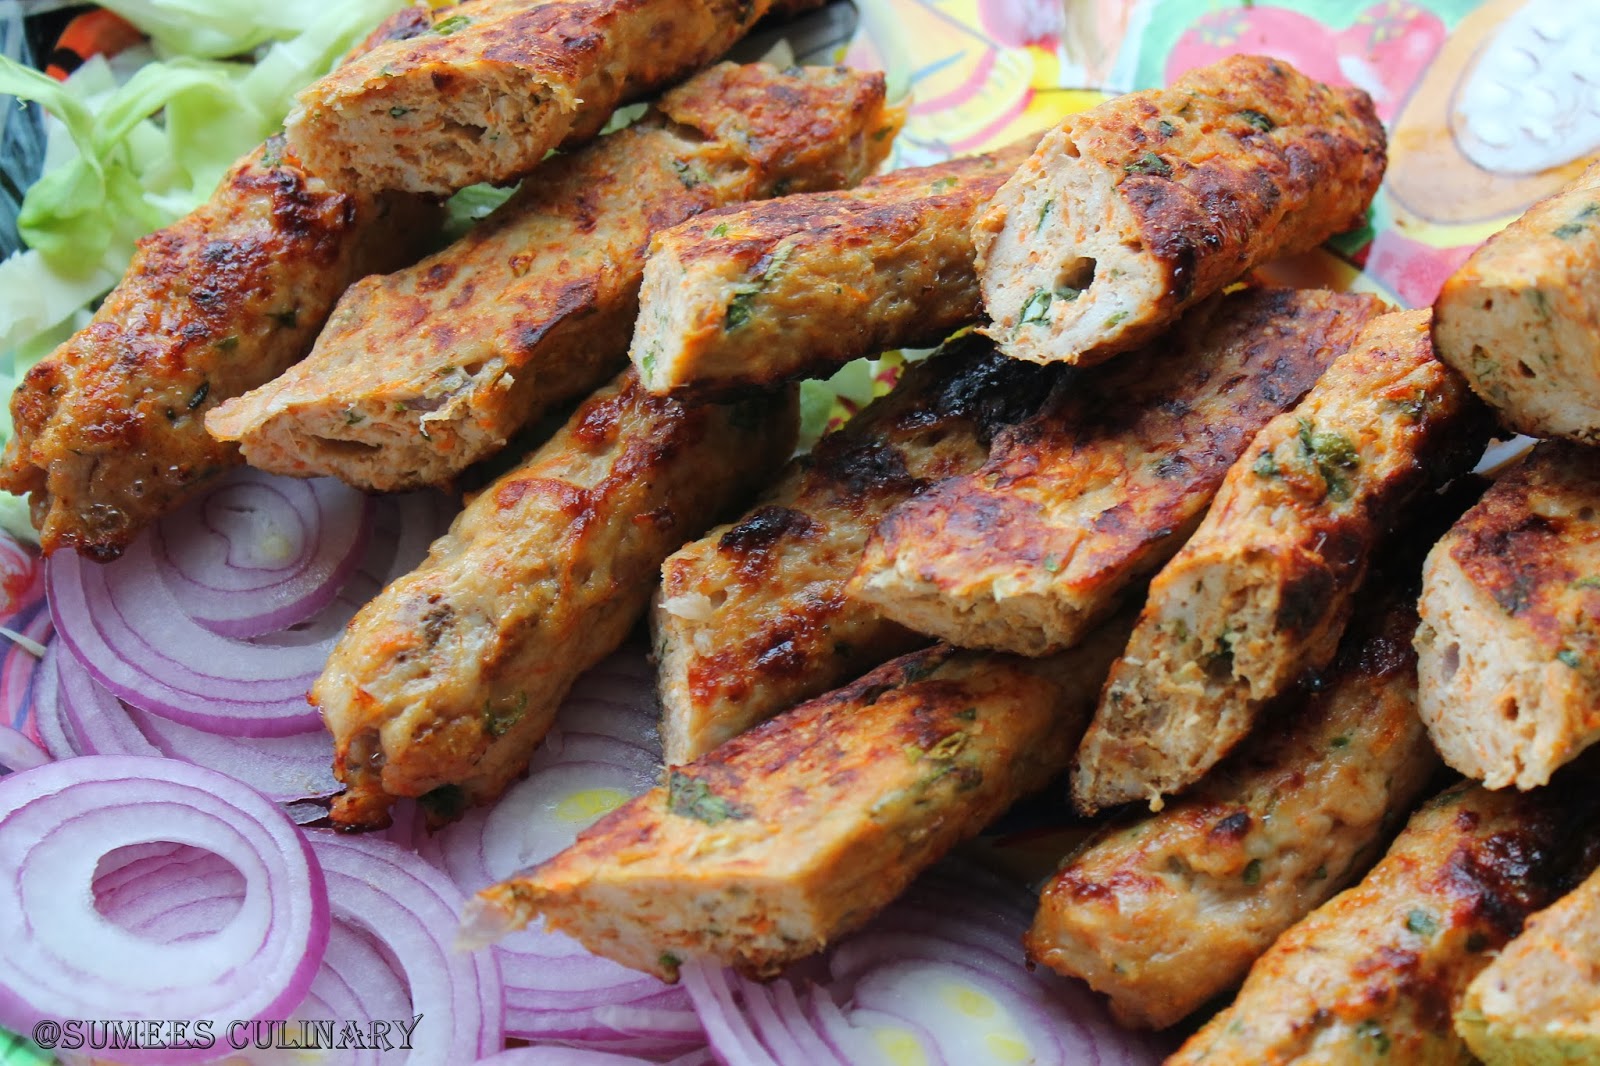
If you love Seekh Kabab put your hands up. Yeah I know all the hands went up, atleast here in my household. It's very simple to make. Don't be scared because it's one of the exotic dishes. Julia Child once famously said, “The only real stumbling block is fear of failure. In cooking you’ve got to have a what-the-hell attitude.” So go for it.
We love the skewered chicken dishes. My kiddos can survive only on this for days. I just add a side salad and some flavored rice. Using the oven allows me to use lesser oil (rather hardly any except what you spray on the tray actually.) So get your oven on and create your magic to impress your loved ones.

Prep Time: 25 min | Cooking Time: 15 min | Total Time: 1 Hr. 45 min. | Makes: 4 large skewers

Ingredients:

Ground Meat (Chicken/ Lamb/ Turkey) - 1 lb *
Onion - 1 large
Carrot - 1 large (Optional)
Ginger - 1 lime size
Garlic - 4 large pods
Coriander leaves - handful
Green Chilies - 2
Sauf/ Fennel Seeds - 2 tsp.
Chili Powder - 2 tsp.
Coriander Powder - 2 tsp.
Garam Masala - 1 tsp.
Salt - 2 tsp.
Meat Skewers - 4 **

Method of Preparation:

~ In a large bowl, grate Onions, Carrots, Ginger and Garlic. Add in finely chopped Green chilies and Coriander leaves.
~ In a mortar, coarsely ground Fennel seeds and add it to the mixture.
~ Add in Chili Powder, Coriander Powder and Garam Masala.
~ Mix all this using hands and add Ground meat and salt. Gently mix them all until combined. Cover this with a plastic wrap and leave it in the refrigerator for an hour.
~ Line a oven safe sheet with a foil. Spray evenly using canola oil/ olive oil spray.
~ Divide the mixture into four equal parts. Now take one portion and form it into a long sausage like kebab while pressing onto the skewer. Do this until the meat is on the skewer. Place it on the prepared sheet.
~ Continue to do the remaining skewers and arrange them on the cooking sheet.
~ Switch on the Broil button on your oven, place the cooking sheet on the highest rack. Broil for 7 minutes. Take it out of the oven and turn the skewers. Put them back into the oven and broil for another 7 minutes. ***
~ Once cooled enough to handle, pull out the Kebab's out of the skewers. Cut them in 4 pieces and serve drizzled with some lemon and cut onions.


Note:

* This can easily turned into a Vegetarian Seekh Kabab. Use fresh Soy meat instead of the ground meat
** You can use bamboo skewers for the purpose. First make sure to soak it in the water for atleast an hour, so that it won't burn out in the oven. Also you might have to use 6 to 8 skewers instead, since they are much smaller in size.
*** To broil you don't have to preheat. Keep an eye on the broiler to make sure your highest rack is not too close to the source of heat. You then run into the risk of burning the kebabs rather than cooking. If you see it's getting burned, remove the sheet from highest rack to middle rack. Place the Kebabs back at the high rack for only last minute of cooking to get nice browned effect.
~ This turns out really great with any kind of ground meat. But Lamb is one of the best. Turkey is good for having lean meat.
~ I usually add carrots, zucchini or any greens while making these, so it adds extra nourishment to our daily diet. You can totally skip this part.
~ Once you add the meat in while mixing, make sure you are handling it gently. Otherwise the end product will become dry.

Sunday, December 15, 2013

Cabbage Paratha/ Patta Gobi Parantha/ Cabbage Tortillas


Parantha's are easy way to get vegetables into kids diet. Though my kids love cabbage subzi, they love the paranthas even more. I do these parantha's in a different way than doing filling of the paratha and then rolling out. I mix them all up which makes the rolling easier. Also I quick stir fry the vegetables, so they are cooked right along with the parantha.


Prep Time: 20 min | Cooking Time: 30 min | Serves: 4 to 6

Ingredients:

Cabbage (Shredded) - 2 Cups
Onion - Small finely chopped
Red Chili Powder - 1 tsp.
Ajwain - 1/2 tsp
Sauf/ Fennel seeds - 1/2 tsp.
Green Chili - 2 finely chopped
Grated Ginger - 1 tsp.
Salt - 1 tsp.
Oil - 1 tbsp.
Whole Wheat Flour/ Multi-grain Flour - 3 Cups
Water
Coriander Leaves (optional) - 1 tbsp chopped fine


Method of Preparation:

~ In a small pan heat oil, add fennel seeds, ajwain and green chilies. Once a nice aroma comes, add in onion, ginger, cabbage and red chili powder. Saute for 5 minutes. Add salt and remove from heat. Let this cool for 5 minutes.
~ Place flour in a wide mouthed pan, add in the cabbage mixture, coriander leaves and knead the dough. Add water as required to make dough consistency. Cover with a moist towel and let it sit for few minutes.
~ Now heat a frying pan. Make small lemon size ball of the dough mixture, dust the rolling surface with flour, roll the dough ball out using a rolling pin make round tortillas/ paranthas. Gently transfer this to the frying pan.
~ Fry one side for half a minute, flip over and let it cook all the way for a minute. Now apply little oil on top and flip over to finish cooking on first side. Remove and serve it hot with yogurt and pickle.


Tuesday, December 10, 2013

Savory Veggie Corn Muffins


Corn muffins are my kids favorite. Since they and we get enough sugar in other ways, I try to do the savory corn muffins more often. These are delicious and can be frozen up to a month. Just take it out and pop it into microwave and they are fresh as out of oven.

Prep Time: 20 min | Cooking Time: 5 min | Baking Time: 30 mins | Makes : 12 to 14 muffins
Serving: 1 Muffin | Calories: 182 | Carbs: 26 | Fat: 5 | Protein: 7 | Sugar: 4 | Sodium: 151


Inspired from here
Ingredients:

Olive Oil - 1 tsp.
Cream Style Sweet Corn - 1 Can
Onion - 1/2 Cup Diced
Red Bell Pepper - 1/2 Cup diced
Broccoli - 1/2 Cup Diced
Salt - 1/2 tsp.
Jalapeno Peppers - 2 finely chopped
Red Chili Powder - 1/2 tsp.
Corn Meal - 2 Cups * I used coarse stone ground
Multi-grain Flour - 1 Cup
Eggs - 2 large
Baking Powder - 2 tsp.
Baking Soda - 1/2 tsp.
Shredded Cheese Mix - 1 Cup
Dried Thyme - 1 tsp.
Dried Rosemary - 1 tsp.
Thick Greek Style Yogurt - 1 Cup
Buttermilk - 1/2 Cup


Method of Preparation:

~ Saute all the vegetables in a tsp of oil. Add the the corn and salt. Let it cool.
~ Pre-heat the oven to 400 deg Centigrade.
~ In a small bowl mix together, corn meal, flour, baking powder, baking soda, thyme and rosemary.
~ Gently stir in the shredded cheese.
~ In a large bowl whisk eggs, add yogurt and mix them. Now add cooled mixed vegetables.
~ Add in dry ingredients in batches alternating with buttermilk, ending with dry ingredients.
~ Spray 12-hole muffin pan. Fill up until little below the rim.
~ Bake for 30 mins or until the toothpick inserted comes out clean.
~ Serve it with ketchup or a hot sauce.


Note: You can use any vegetables of your choice. Some of them that turn out really good are mushrooms, Fresh Corn, beans, any kind of green vegetables like spinach or kale,

You might also like
Pizza Sauce
Pizza Muffin Bread

Disclaimer: Nutrition fact is based on ingredients that I have used and is an approximate. It is calculated using Recipe Nutrition Calculator from a health website.

Sending this to Vardhini's Bake Fest event @With A Spin

Wednesday, December 4, 2013

Sardines in Spicy Tomato Sauce/ Tarli Phanna Upkari


I remember in my summer vacation when we used to visit my maternal grandma, she would keep tarli prepared in a small earthen pot. The more days you keep the tastier it would become. It's almost like pickle, when you think of it, it makes your mouth water. It's spicy and tangy. One of the dish that my mom prepares well too. I was always apprehensive of preparing the authentic tarli sol or upkari. This particular dish is courtesy of my friend Shubhi. One day she prepared this right in front of my eyes and I couldn't believe how good it was. It didn't needed an earthen pot (am sure that will enhance the taste though), nor needed to sit longer to taste better. This Sardines dish has become one of mine and my DH's favorite, and can be prepared in jiffy.

Prep Time: 2 min. | Cooking Time: 15 min | Serves: 6

Recipe Source: Shubhangi
Ingredients:
Sardine - 1 can (Sardines in Tomato sauce)
Tomato Sauce - 1 Can (or Tomato Juice)
Oil - 1 tsp.
Mustard - 1/2 tsp.
Hing/ Asafeotida - 1/2 tsp.
Chili Powder - 1 tbsp. *
Salt - 1 tsp.
Sugar - 1/2 tsp.


Method of Preparation:

~ In a thick iron cast pan heat oil and add mustard seeds.
~ When the mustard starts crackling, add hing and fry for few seconds.
~ Now add chili powder, tomato sauce and sardines.
~ Bring everything to boil, add salt and sugar, mix it all gently.
~ Simmer for couple of minutes and take it out of heat.
~ It goes really well with just plain rice.


NOTE:
~ Chili should be added according to your spice level. It has to be little spicier.
~ Instead of tomato sauce you could use V8 tomato juice. Just hold the sugar.
~ Check on the salt since canned sardines and tomato sauce has some salt in it.

Wednesday, November 27, 2013

Dry Fruits and Nuts Burfi/ Dates Rolls


Happy Thanksgiving everyone! Busy with prepping, cooking already? I don't have to do much except take a dessert to my friends place where she's hosting Thanksgiving dinner. She asked for brownie, so I will soon be preparing my to go recipe of Double Chocolate Brownie.

My kiddos don't eat nuts except pistachio. If I don't powder it and put it in without their knowledge there is no way I can get them to eat them by themselves. These Dry fruit Rolls though are a hit with my son. He doesn't mind this, even though he can see all the chunks of dry fruits in. I have to admit first time it was hard to get him to have one bite... But after first bite there is no turning back. He usually gobbles down 2 or three. I have cut them in round, but you can always cut it into desired shapes. Try this dessert for the holiday and let the guest marvel over the taste.


Prep Time: 15 min | Cooking Time: 15 min | Makes : About 4 dozen

Ingredients:
Dates - 2 Cups Packed
Almond - 1 Cup
Pistachio - 1 Cup
Cashew Nuts - 1 Cup
Condensed Milk - 1 tbsp.
Ghee - 1 tsp.


Method of Preparation:

~ Pulse almond, pistachio and cashew nuts in a food processor for few seconds. We should have small pieces of it (not powder). Keep them aside.
~ In a thick bottomed vessel, heat ghee and dates. Once it's heated mash it using a potato masher.
~ Add condensed milk and cook for another 5 mins, it starts to come together.
~ Switch off the heat and add all the dry fruits.
~ Mix them together and leave it to cool a little bit.
~ Make roll out of the mixture and wrap it in parchment paper. Leave it in the refrigerator for half an hour, so you can cut them easily.
~ Take it out and cut them into discs. * Before cutting them you can roll them into dehydrogenated coconut flakes. I usually skip if I am leaving it out for long for kids to eat everyday.
~ Store them in an air tight container. They stay good on the counter for 2 to 3 weeks.


Sending these for Hearth and Soul Blog Hop.

Friday, November 22, 2013

Cilantro Chutney/ Coriander Chutney/ Green Chutney Konkani Style


Last night I had made Idly and Chutney. When I posted the picture on my Facebook page, I got lot of inquiry for the chutney. The chutney that was in that picture was Celery Chutney. Then I noticed that I didn't had the green chutney recipe that I usually do. This is my mom's way of doing the chutney. This goes great not only with Idly and Dosa, you can put it on a sandwich and add some vegetables and voila your lunch sandwich is ready. This can be saved in the fridge for 3 or 4 days. While reusing, warm it a little bit in a microwave.

Ingredients:

To Grind:
Coconut - 1 and 1/2 Cup
Coriander/ Cilantro - a bunch (about a cup not packed)
Putani/ Dalia split lentil/ Hurigadale - 2 tbsp.
Tamarind concentrate - 1 tsp. extract
Green Chili - 4 to 5 (depends on the spiciness level you can handle)
Ginger - Half lemon size
Salt to taste

For Tempering:
Oil - 1 tsp.
Mustard seeds - 1/2 tsp.
Curry / Kadipatta leaves - 1 spring
Garlic - 1 Crushed
Red Chili - 1

Method of Preparation:

~ Grind everything in the ingredients list under "To Grind" to fine paste. You can check half way through on the spice, salt and add if needed. Take it out in a service bowl.
~ In a small pan heat oil, let the mustard start crackling, add crushed garlic, red chili and curry leaves.
~ Pour it over the prepared chutney. Serve it after mixing them.

This will go really good with
Rava Idly 
Urid Dosa
Oatmeal Dosa
Dill Dosa/ Sweet Green Dosa
Onion Uttappa
Pan Pole/ Neer Dosa/ Thin Lacey Dosa

Monday, November 18, 2013

Spiced Peach Muffins (Eggless)


Holidays are approaching and every household is preparing for it. My kiddos for their love of fruits want me to use fruits in any recipe. These muffins I baked a while ago. Peaches are still in abundance at grocery stores. If you want to sneak in any fruits in your diet, these are a great way. Put a dab of cream cheese and add a coffee or tea, your scrumptious breakfast treat is ready. :o)

Recipe source - Babble

Prep Time: 15 min | Baking Time: 25 to 30 mins | Makes 12 to 15 muffins


Ingredients:

Multi-grain + Unbleached All-Purpose Flour - 2 Cups
Salt - 1/2 tsp.
Allspice powder - 1/2 tsp.
Ground cinnamon - 1/2 tsp.
Baking powder - 2 tsp.
Brown sugar - 1 Cup
Flaxseed meal - 1 tbsp. *
Oil - 1/2 Cup
Milk - 3/4 Cup
Peaches, diced - 2 Cups
2 tbsp Brown sugar with 1/4 tsp Cinnamon - To sprinkle on top


Method of Preparation:

~ Preheat the oven to 400 deg Fahrenheit. Line muffin pan.
~ Add two tablespoons of warm water to flaxseed meal and set aside. (Note you can replace flaxseed meal with an egg. Then no need of this step. Egg can be beaten and directly added to the mixture.)
~ In a large bowl combine flour, salt, baking powder, brown sugar, allspice and cinnamon.
~ Stir in flaxseed mixture, oil and milk.
~ Once everything is combined, gently stir in diced peaches.
~ Drop big spoonful into the muffin cups to fill until the rims. Sprinkle the top with Sugar and Cinnamon mixture.
~ Bake for 25 to 30 minutes, or until inserted toothpick comes out clean.
~ Rest for few minutes before digging in.


Sending these to Vardhini's Bake Fest event

Thursday, November 14, 2013

Karathe Kismuri/ Hagalkaayi Kosumbari/ Bitter Gourd Relish


Karathe or Bitter Gourd is extremely bitter if you try to eat it as is. It is considered to be very good for diabetic patients. And today happens to be World Diabetics Day! When I was looking to see if there were any scientific proof about bitter gourd reducing the blood glucose levels, I stumbled across this link. Didn't know there was a website dedicated to bitter gourd.

My mom would make variety of dishes using karathe and this is one of the relish that she would make. Being part of Konkani group reminding me all these dishes that my mom would serve us. Me and my hubby loved karathe since childhood and I see the same trend in my son. He just loves any variations of bitter gourd. You can adjust the jaggery as per your taste. If you can handle the bitterness then more power to you and less to jaggery. :o)


Prep Time: 20 min | Cooking Time: 10 min| Serves: 4

Ingredients:

Bitter Gourd - 2 medium
Oil - 1 tbsp.
Jaggery - 1 tbsp.
Turmeric Powder - 1/4 tsp.
Chili Powder - 1 tsp.
Grated Coconut - 1 Cup
Coriander Powder - 1/2 tsp.
Onion - 1 small finely chopped.
Coriander Leaves - half a handful
Salt to taste

Method of Preparation:

~ Wash and scrape off bitter gourd skin. Cut it lengthwise and de-seed. Chop them in small pieces, add salt and leave it for few minutes.
~ Heat oil in a pan, squeeze the bitter gourd a little to take out the moisture and add it to the hot pan.
~ Shallow fry until they are almost done. This needs patience since you have to keep it on medium heat and keep frying. Now add haldi/ turmeric powder and jaggery. Give it a nice mix and take it out of heat. Allow to cool for few minutes
~ In a bowl add onion, chili powder, coriander powder and little salt. Nicely mix them together. It turns out good when you squeeze everything together and mix with hand (yeah, I said it.. magic of hand mixing)
~ Add in freshly grated coconut, chopped coriander leaves and fried bitter gourd pieces. Mix it all up and serve on the side with Plain Rice and Daali Thoy.


You may be also interested in Bitter Gourd Subzi

Sending this dish to Nandoo's event Dish it out - Coconut & Salt

Monday, November 11, 2013

Basil Zucchini Noodles with Grilled Corn


I have to admit, we are hooked on to Zucchini noodles at our home. It's so much healthier than the starchy noodles, fills you up and are super quick to make. I don't have a tool to make the zucchini noodles to come out in exact round noodles. So I just use a peeler to make flat noodles out of Zucchini. This is how they look.


Zucchini is almost out of season now, while it was in season, I was buying them from the local market. They had some of the huge ones that I had never seen before. So bring one and you are set for 2 or 3 recipes. :o)

Prep Time: 15 min | Cooking Time: 15 min | Serves : 4
* Serving Size: 2 Cup | Calories: 104 | Carbs: 20 | Fat: 2 | Protein: 6 | Sugar: 10 | Sodium: 313

Ingredients:
Zucchini - About 4 Cups of Noodles
Hot green peppers - 2
Onion - 1 small
Tomato - 3 medium
Colored Bell Pepper - 1 small
Garlic - 6 big cloves
Lemon Basil - big handful
Corn from Grilled Corn on the cob / Some roasted fresh corn - 2 Cups
Salt to taste


Method of Preparation:
~ Finely chop peppers, onion, tomato and garlic. Place all of it in a sauce pan and cook for about 5 minutes stirring once in a while. Add salt to taste.
~ Meanwhile bring water to boil in a pot and add salt. Add Zucchini noodles and cook for 3 minutes until just done. Drain the water and drop the noodles into the sauce.
~ Top it with roasted Corn and chopped Basil leaves.
~ Enjoy a nice hot one pot meal.

Disclaimer: Nutrition fact is based on ingredients that I have used and is an approximate. It is calculated using Recipe Nutrition Calculator from a health website.

Sending this healthy seasonal fresh food over to Nandoo's Eat Seasonal Food event

Wednesday, November 6, 2013

Arugula Salad Pizza


One fine day when I switched on Food Network, saw Ree of Pioneer Woman cook a Fresh Herb Pizza. It looked exactly like the one that I had fortnight ago at a family owned pizza place. And that weekend, our friend who picks up their fresh produce from a  farm where they have membership, dropped some salad greens. Stars must have aligned right, so it was a sign, and I made this beautiful looking pizza. It was an instant hit with my family. Other than younger one, who despises any green fresh thing on her food, all of us devoured it. I left half of the pizza uncovered for her and she loved every bit of it. And I am not kidding when I say all of us over ate. BTW just noticed that this is my first post with yeast. Yes! I am not afraid anymore to use yeast in my recipes.


Prep Time: 15 min | Inactive Time: 1 Hour | Cooking Time: 15 min | Serves: 4

Recipe Based on: Fresh Herb Pizza

Ingredients:

Pizza Base -
Multi-grain Flour/ AP Flour - 2 Cups
Active Dry Yeast - 1 tsp.
Warm Water - 1 Cup
Salt - 1/2 tsp.
Pepper - 1/4 tsp. Freshly ground
Light Olive Oil - 1/4 Cup
Olive Oil for drizzling - 1 tbsp.

Pizza Sauce - 1 Cup
Shredded Cheese - 1 Cup


Salad Topping -
Arugula - 1 Bunch
Pomegranate seeds - 1 tbsp.
Salt
Pepper
Lemon Juice - 1 tsp.
Olive Oil - 1 tsp.


Method of Preparation:
~ Add yeast into the warm water and let it sit for 5 minutes.
~ Meanwhile, add some salt and pepper in the flour. Mix in olive oil and combine well. Now slowly add the yeast mixture and mix until just combined.
~ Add 1 tbsp. of olive oil and just roll the dough lightly, cover the container and leave it to rise for atleast an hour in a warm place.
~ When ready to make the pizza, preheat the oven to 500 deg Fahrenheit.
~ Take out the pizza dough cover, punch the dough lightly and start rolling it out. Drizzle little oil on the pizza stone or pizza pan or sheet, and transfer the rolled out pizza on to this.
~ Top the pizza base with pizza sauce and shredded cheese
~ Bake this for 15 minutes on the bottom rack, or until the crust is golden brown.
~ Toss all the ingredients together for the salad. Top the pizza with salad and serve it.


Notes:
~ You can use different types of greens salad. Sky is the limit as to what you want to top it or what kind of salad.
~ Or can just have pizza with just sauce and cheese.
~ Store bought pizza sauce can be used or even ketchup would suffice.
~ Can serve it topped with Parmesan cheese.

Sending this yummy pizza to Vardhini's Bake Fest event

Saturday, November 2, 2013

Microwave Mysore Pak

Happy Diwali to all my friends and Family. May the light be with you always!


Mysore Pak is a famous sweet dish that originated in city of Mysore, Karnataka. In it's true self it uses quite a bit of butter and long procedure to make. I saw this recipe for microwave recipe on a food group that I am part of and thought of trying it out. It was so quick and easy to prepare that I think this will be my go to sweet if I have to do Indian exotic dessert very quickly.

Prep Time: 10 min | Cooking Time: 5 min

Ingredients:

Besan/ Chick Peas Flour - 1 Cup
Sugar - 2 Cup
Ghee - 1 Cup
Milk - 2 tbsp.


Method of Preparation:

~ In a heavy bottomed pan or wok, fry besan until nice aroma comes and color changes to golden brown. Note that you can do this part in microwave too.
~ Prepare a 6X6 inch dish by greasing the dish with a teaspoon of ghee.
~ Add the remaining ghee in a microwavable container and microwave high for a minute.
~ Add all the remaining ingredients, mix them thoroughly and microwave for three minutes in interval of one minute. Take it out and mix it thoroughly. You should inbetween notice ghee and besan separating, don't worry keep microwaving. At the end of three minutes, heavy bubbles starts to form and everything starts to come together when you mix.
~ Now microwave for one and half minute at the interval of 30 seconds.
~ Take out and immediately pour into the prepared dish and smooth the top.
~ Let it cool for 15 minutes and then cut into desired shape.


Sending this to Vardhini's Diwali Event

Monday, October 28, 2013

Spicy Spooky Finger Shaped Cookies


Happy Halloween! Halloween is one celebration that I don't get actually. :o) But what to do when you have kids who wants to dress up and a hubby who loves it even more. So I usually go with the flow. First thing kids ask me is what kind of cookie are we going to make. Had done one of these cookies a while back and everybody had enjoyed the spiciness of it. So I decided to make these witches fingers. Basically you can take any good cookie recipe and have fun with the shapes. If you would try these, you sure would say they were spooky and spicy. My friend's kid who saw this refused to eat it coz of the shape. Later when he eventually tried, he wanted another one. But before I could start taking pictures, they started to mysteriously vanish!!. So I hurried and got some pictures before my two little munchkins could clean it up.

Ready to go into the oven


Prep Time: 30 min | Sitting Time: 30 min | Makes : 2 to 3 dozen

Ingredients :

Multi-grain Flour/ All Purpose flour - 1 1/2 Cups
Salt - 1/4 tsp.
Baking Soda - 1/2 tsp.
Cayenne Pepper - 1/2 tsp.
All Spice Powder - 1/2 tsp.
Sugar - 1/2 cup
Unsalted butter - 1/2 cup
Egg - 1
Vanilla extract - 1 tsp.
Nutmeg extract - 1/2 tsp.
Almond Slivers


Method of preparation:

~ Mix and sieve salt, baking soda, Cayenne Pepper and All Spice Powder with flour.
~ In another bigger bowl beat butter and sugar until smooth.
~ Add egg, vanilla and nutmeg extracts.
~ Now mix dry ingredients into the wet ingredients. It would be like a dough.
~ Cover the dough in a plastic wrap and put it in the refrigerator for half an hour.
~ Preheat the oven to 350 deg Fahrenheit.
~ Take the dough out from refrigerator and form it into log. Cut them into four parts. Roll each log out into a rectangle with a thickness of 1/4th of an inch. The length of the rectangle being length of the finger you want. Once rolled out cut lengthwise strips. You will get about 6 or 7 strips.
~ For each strip, shape them with hand, into finger shape. With butter knife score the knuckles. Press in an almond sliver for the finger nail. You can paint it with food color if you would like.
~ Continue to make all the finger shaped cookies. Arrange all the cookies on a cookie sheet lined with aluminium foil.
~ Bake them for 15 to 20 minutes until they are golden brown.
~ Take out on a cooling rack after 2 minutes and allow it to cool completely.

Related Posts Plugin for WordPress, Blogger...