Monday, October 28, 2013

Spicy Spooky Finger Shaped Cookies


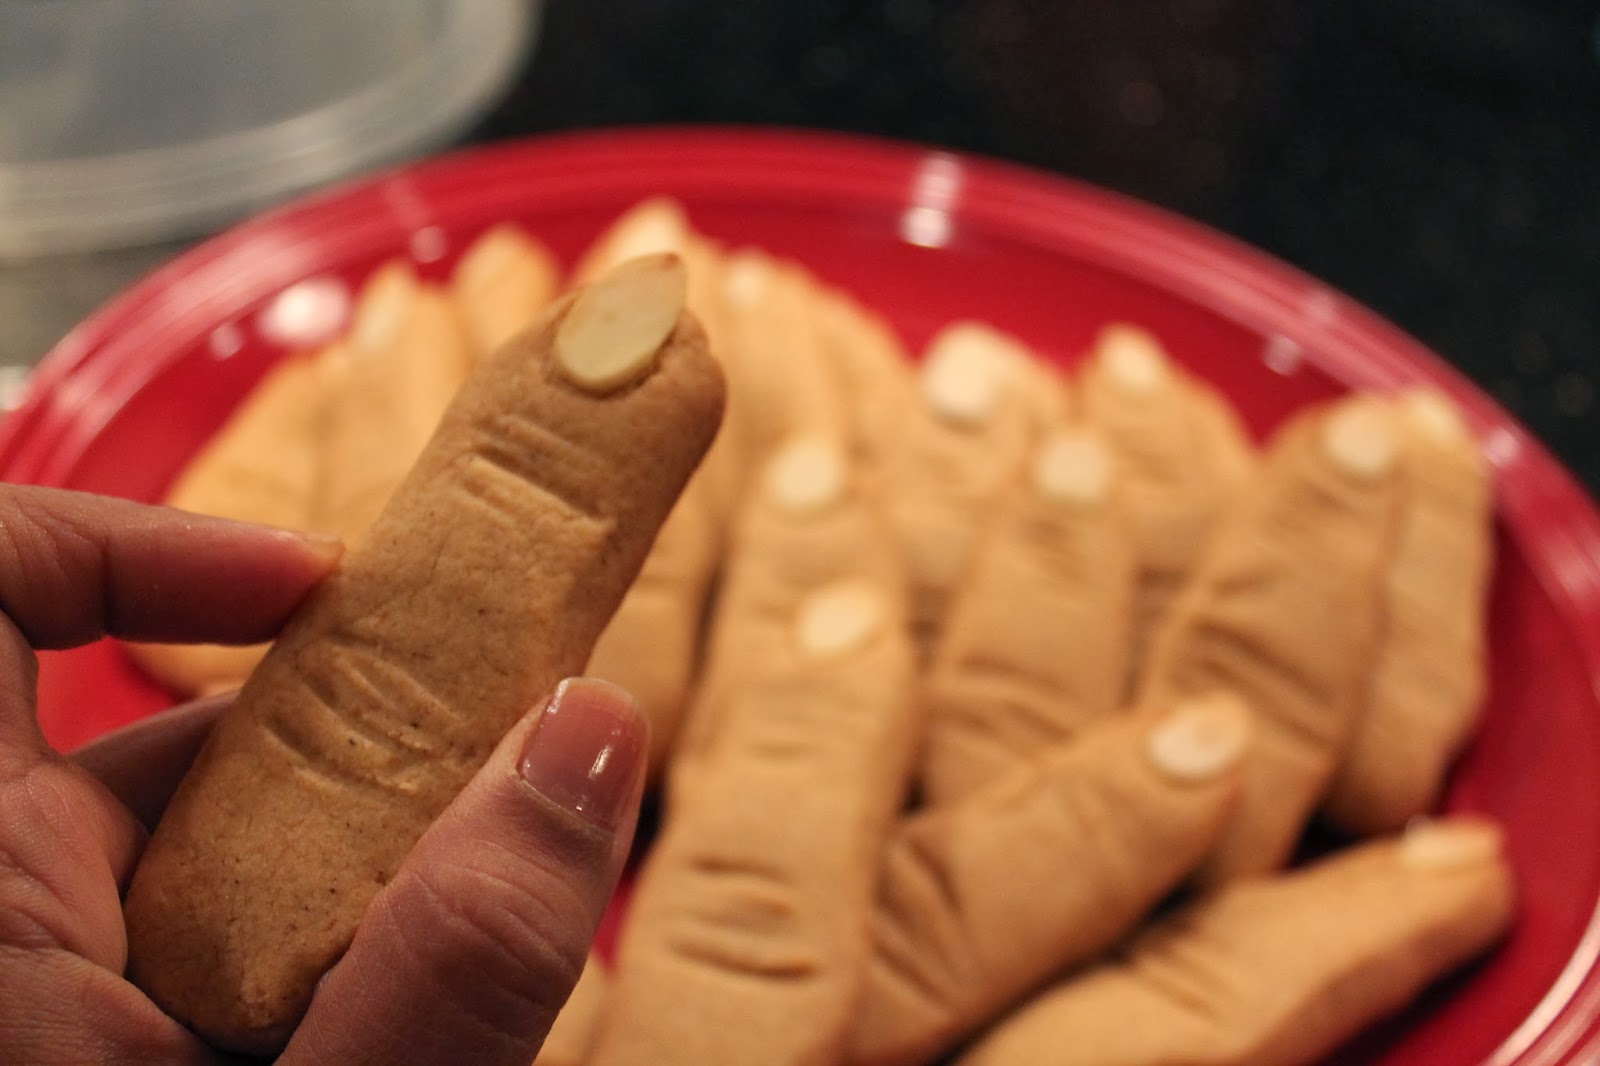
Happy Halloween! Halloween is one celebration that I don't get actually. :o) But what to do when you have kids who wants to dress up and a hubby who loves it even more. So I usually go with the flow. First thing kids ask me is what kind of cookie are we going to make. Had done one of these cookies a while back and everybody had enjoyed the spiciness of it. So I decided to make these witches fingers. Basically you can take any good cookie recipe and have fun with the shapes. If you would try these, you sure would say they were spooky and spicy. My friend's kid who saw this refused to eat it coz of the shape. Later when he eventually tried, he wanted another one. But before I could start taking pictures, they started to mysteriously vanish!!. So I hurried and got some pictures before my two little munchkins could clean it up.

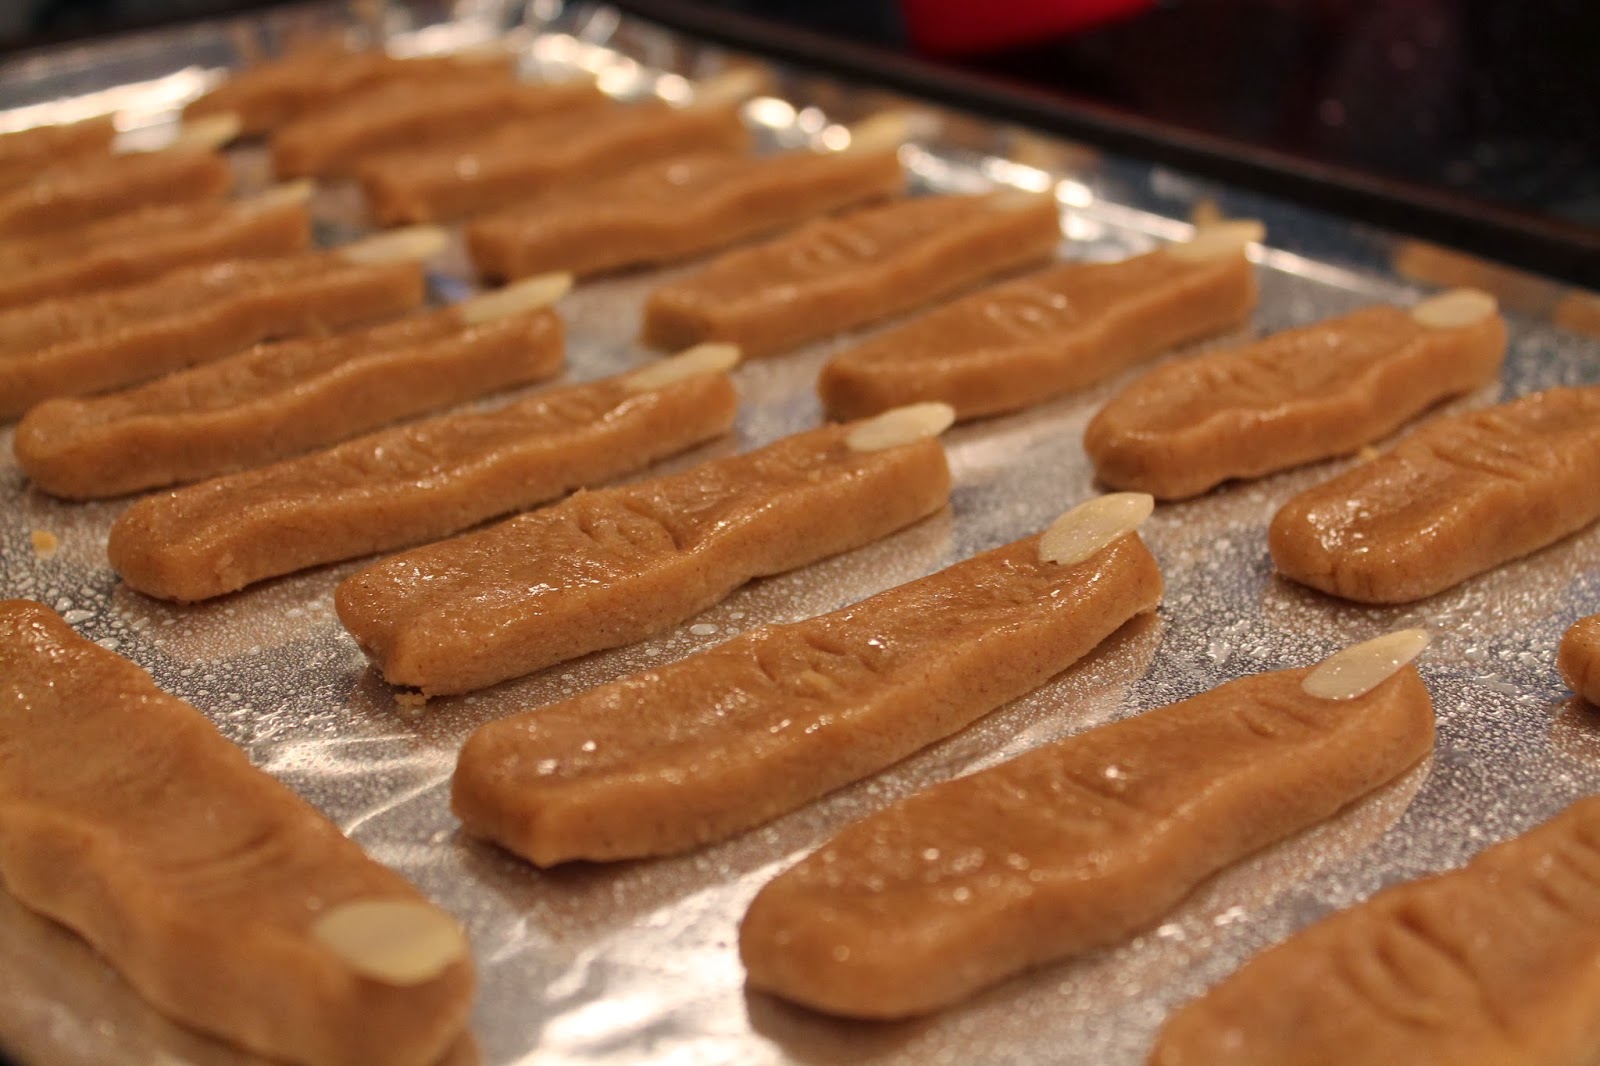
Ready to go into the oven


Prep Time: 30 min | Sitting Time: 30 min | Makes : 2 to 3 dozen

Ingredients :

Multi-grain Flour/ All Purpose flour - 1 1/2 Cups
Salt - 1/4 tsp.
Baking Soda - 1/2 tsp.
Cayenne Pepper - 1/2 tsp.
All Spice Powder - 1/2 tsp.
Sugar - 1/2 cup
Unsalted butter - 1/2 cup
Egg - 1
Vanilla extract - 1 tsp.
Nutmeg extract - 1/2 tsp.
Almond Slivers


Method of preparation:

~ Mix and sieve salt, baking soda, Cayenne Pepper and All Spice Powder with flour.
~ In another bigger bowl beat butter and sugar until smooth.
~ Add egg, vanilla and nutmeg extracts.
~ Now mix dry ingredients into the wet ingredients. It would be like a dough.
~ Cover the dough in a plastic wrap and put it in the refrigerator for half an hour.
~ Preheat the oven to 350 deg Fahrenheit.
~ Take the dough out from refrigerator and form it into log. Cut them into four parts. Roll each log out into a rectangle with a thickness of 1/4th of an inch. The length of the rectangle being length of the finger you want. Once rolled out cut lengthwise strips. You will get about 6 or 7 strips.
~ For each strip, shape them with hand, into finger shape. With butter knife score the knuckles. Press in an almond sliver for the finger nail. You can paint it with food color if you would like.
~ Continue to make all the finger shaped cookies. Arrange all the cookies on a cookie sheet lined with aluminium foil.
~ Bake them for 15 to 20 minutes until they are golden brown.
~ Take out on a cooling rack after 2 minutes and allow it to cool completely.

Wednesday, October 23, 2013

Vaali Ambat/ Basale Soppu Curry/ Malabar Spinach Curry


I have previously shared Vaali Ani Sungat Randhyi that uses Malabar Spinach and Shrimp as the main ingredients. This is another Konkani delicacy that's very common to most households. Many have the vine growing in their backyard, so that whenever they want they can just go over and bring in the fresh produce and use it. I can never make up my mind if I like the vegetarian or non-veg version better. Try both and let me know your view. :o)

Prep Time: 15 min | Cooking Time: 30 min | Serves : 6

Recipe Courtesy: My Aayi
Ingredients:
Vaali/ Basale Soppu/ Malabar Spinach - 1 bunch (About 4 Cups)
Split Red Gram/ Tuvar Dal - 1/2 Cup
Onion - 1 medium size
Tomato - 1 medium size
Turmeric Powder - 1/4 tsp.
Salt - 2 tsp.

For grinding Masala:
Grated Coconut - 2 Cups
Red Chili - 4
Coriander Powder - 2 tsp.
Mustard Seeds - 1 tsp.
Garlic - 2 pods


Method of preparation:

~ Wash Dal, add a cup of water along with chopped Onion and Tomato. Add turmeric powder and pressure cook for three whistles.
~ While the pressure cooker is cooling down, prepare the masala. Grind everything under the grinding masala list to a fine paste while adding a cup of water in intervals.
~ Wash Vaali thoroughly with water. Chop them coarsely.
~ In a wide, heavy bottomed pan cook the greens first.
~ Once it starts to wilt and change to darker green color, add the ground masala.
~ Let the mixture bring to a boil.
~ Mash the contents in the pressure cooker and add it to the pan. Add enough water as required.
~ Add salt to taste and mix them all together. Bring the curry to a boil and switch off the heat.
~ Serve it hot with plain white rice.

Friday, October 18, 2013

Macaroni and Black Bean Salad


Have you ever noticed how many variety of salads they have at the salad bar of big grocery shops? Well I have. And once I made a grave mistake of buying some. No, don't get me wrong. They were tasty. But super pricey! I came up with this salad when I had some leftover pasta from previous night. It was such a big hit that now I make macaroni for this salad. :o) I have used few of the vegetables when I clicked these pictures. But you could add many more veggies that you like. Some of them that I have tried are, corn and cucumber. Corn especially is the kind that I love.

Prep Time: 15 min | Cooking Time : 6 to 7 minutes | Serves : 4
* Serving Size: 1 Cup | Calories:130 | Carbs: 23 | Fat: 3 | Protein: 6 | Sugar: 2 | Sodium: 122


Ingredients:

Elbow Pasta - 3/4 Cup (If leftover cooked pasta - 2 Cups)
Bell Pepper - 1 finely chopped
Cherry tomatoes - 1/2 Cup Chopped
Black Beans - 1 Can
Coriander/ Cilantro - handful
Cayenne Pepper - 1/4 tsp.
Black Pepper - 1/4 tsp.
Lime juice/ red wine Vinegar - 2 tsp.
Salt - 1/2 tsp.
Olive Oil - 2 tsp.

Method of Preparation:

~ Make macaroni according to package direction. You would want to cook it 'al dente' and not cook over. Because you really don't want a mushy salad. Drain and immediately rinse with cold water and keep it aside in a colander for all the water to drain.
~ Wash the black beans under running water and drain thoroughly.
~ Now mix all the ingredients with black beans and macaroni.
~ Leave it in the fridge for atleast half an hour before serving.

Disclaimer: Nutrition fact is based on ingredients that I have used and is an approximate. It is calculated using Recipe Nutrition Calculator from a health website.

Tuesday, October 15, 2013

Vermicelli Kheer/ Sevai Payas/ Vermicelli Pudding


Kheer is one of the basic sweet that many household in India do. This is one of quickest dessert to prepare. Even here in US I have seen most of the Indian restaurants have either Rice Kheer or Vermicelli Kheer on their buffet menu. This is my mom's recipe that I prepared for Durgashtami. This can be served hot or chilled.

Prep Time : 10 min | Cooking Time : 15 min | Serves : 4


Ingredients:
Ghee - 1 tbsp.
Vermicelli Noodles - 1/2 Cup
2% Milk - 2 1/2 Cups *
Sugar - 1/2 Cup
Safron - Few strands
Raisins and Cashews - 1/4 Cup

Method of Preparation:
~ Heat ghee in a sauce pan, fry raisins and cashews until cashews turn slight brown and raisins plump up (1 minute)
~ Fish them out onto a small plate. Now in the same pan add noodles and fry them until they are golden brown (Note that you can use fried noodles to make it quicker.)
~ In another pan bring milk to first boil with saffron. Immediately add vermicelli and cook vermicelli while stirring. Make sure none of them stick together.
~ Once the milk comes to another boil, add sugar, mix it thoroughly and take it out of heat.
~ Serve it garnished with fried raisins and cashews


Notes:
- Once cooked, the noodles fluff up and absorb the milk. I use 1:5 ratio which gives nice consistency. If you like it thicker you can lower the milk upto 1:3 ratio. If you like it thinner, increase milk to 1:6 ratio.

Sending this delectable dish to Kids Delight @Spice your life
Nupur's Festive Collection
Vardhini's Diwali event


Tuesday, October 8, 2013

Kaayi Obbattu/ Kaayi Holige/ Narla Ubbatti/ Pooran Poli/ Coconut relish filled tortillas


Happy Navarathri everyone! Hope all of you having a good celebrations and enjoying the vacation. Here the weather is quickly changing. Yesterday went out and was surprised to see that all the leaves from four large trees in front of the house were on the ground. Fall is here! But the festivities must go on. Though it doesn't feel like back in India. Dushera used to be a big family gathering for us. Here, not so much. But looking forward to meeting up friends and family soon after Dushera.

Growing up in Bangalore  we got introduced to Kaayi obbattu, that is obbattu made out of coconut. It was a different taste and texture than the soft and melt in the mouth chana daal one. They come out more crisp and break easily when you try to fold. But ofcourse it had to win our hearts since, yeah you guessed it right, there is COCONUT in it. Below is the recipe that my mom follows (well she never measures!) Some use poppy seeds instead of sesame seeds. And ofcourse my main change is I use normal roti flour (which is usually multi-grain flour) instead of all purpose flour. See notes below to make substitution.


Prep Time: 20 min | Makes : About dozen

Ingredients:
Outer covering:
Multi-grain Flour - 1 1/2 Cup *
Water - As required to make dough
Pinch of Salt
Oil - 1 tbsp.

Inner Filling / Hoorna:
Coconut - 1 1/2 Cup
Jaggery - 1 Cup
Ghee - 1 tsp.
Cardamom powder - From 3 pods
Sesame/ Til seeds - 1 tsp.

* Note that the outer covering is usually made of all purpose or Maida flour. I prefer the multi-grain to this. If you choose to do AP flour, just increase the oil to about 2 tbsp. After kneading you have to leave this for atleast an hour.

All Rolled out 

Method of Preparation:
~ In a large bowl mix flour and salt. Add enough water, knead to make smooth dough (of play dough consistency). Now add the oil, knead some more and leave it covered for 30 minutes.
~ Meanwhile, make the hooran part. This is the part that goes inside the outer dough covering.
~ In a thick bottomed vessel, fry sesame seeds on  a low flame. Take out after about 3 minutes.
~ Heat ghee in the same pan and add jaggery.
~ Once jaggery is melted, add coconut, sesame seeds and cardamom powder. Keep mixing until everything nicely combined together. About 7 ~ 10 minutes. Do not keep it too long, otherwise filling will become too thick. Switch off the heat and let it cool.
~ Begin making the flat breads or obbattu only when the filling is cooled off.
~ Make 12 equal parts of the dough and the filling.
~ Sprinkle little bit of flour on the work surface. Take one dough ball and roll out little to make a small circle. Place one filling in the middle. Pull all the sides of the dough and cover the filling completely.
~ Continue to place all the remaining fillings inside each dough ball.
~ Now heat a griddle/ tawa. Roll out the dough (with filling inside) gently. Do not worry if the filling starts to come out a little.
~ Put this on the hot griddle, cook for half a minute and turn it over. Note that it will be just half done.
~ Once the other side is cooked (about a minute), add little ghee or oil on the top and flip it over to complete the cooking process on the first side.
~ You can eat them hot off of tawa with little ghee. This can be stored up to 4 days to a week.
~ To let the obbattu's cool down completely, don't stack them. Just spread it around on an old news paper or on large platter. After it's cooled down, store them in a air tight container.


Sending this festive dish to Chandrani's event Spotlight - Festive,
to Kids Delight @Spice your life
Nupur's Festive Collection
Vardhini's Diwali Event


Wednesday, October 2, 2013

Baked Whole Black Pomfret


Baking is like therapy. And when it's fish that's baking then it's Nirvaana! Yes. I love baked fish and I do it many times. Why baking you ask? Let's look at some of the pros. I don't have to baby sit, uses way less oil than pan fried and tastes juicier. Long time back when I first baked, my son, who was a little toddler and my DH sat around and just devoured the fish. I was really amused by my little ones love for the fish. Bake or no bake he never faltered on that tradition of sitting with Dad and eating that first before anything else. As he is getting older he wants me to bake it more than pan frying it. So here is our favorite recipe of mine.

Prep Time: 20 min | Marinating Time: 1 Hr or more | Cooking Time : 30 ~ 35 minutes* | Serves : 4

Ingredients:

Black Pomfret/ Paplet - 4
Chili Powder - 2 tbsp.
Turmeric Powder - 1/2 tsp.
Tamarind Concentrate - 1 tbsp.
Ginger - small lime size
Garlic - 7 big cloves
Garam Masala Powder - 1/2 tsp.
Salt - 2 tsp.


Method of Preparation:

~ In a small bowl, grate ginger and garlic. Add everything else but fish, in the ingredient list and mix thoroughly to make a paste and keep it aside.
~ Cut the tail and fins off of the fish. Make a slit near the stomach and clean out everything from inside the stomach. Wash all the fish thoroughly with running water.
~ On each side of the fish, make two slits.
~ Rub the prepared paste onto the fish and inside the hollow stomach area.
~ Cover and let the fish marinate for atleast an hour. (More the better :o)). If you are planning to marinate for more, leave it in the refrigerator.
~ When ready to bake, take out the fish if it's in refrigerator. Preheat the oven to 300 deg Fahrenheit.
~ On a baking sheet, cover with a foil and spray with a non-sticking spray. Line the fish on the sheet and spray again.
~ Stick it in the oven and bake for 30 to 40 minutes. Half way through at around 20 minutes, flip the fish and continue to bake until a light crust forms on top of the fish.
~ Squeeze some lemon and serve them hot. Meat just slides off the bones if you want to serve in little pieces instead of whole fish.

Best served with some hot rice and Daali Thoy.
* Note that cooking time needs to be increased or decreased depending upon the number of fish. Here I have given approximate time for baking four large fish.

Sending this to Valli's event 'Side Dish Mela'
Related Posts Plugin for WordPress, Blogger...